
CASE STUDIES
Published on Mar. 14th 2024
3D Scanning Stamping Dies: Upgrading From “Points” to “Surfaces”
This case study involves 3D scanning stamping dies in the automotive industry. To obtain more comprehensive data sets, the client upgraded from photogrammetry to high-precision 3D laser scanning.
This case study involves 3D scanning stamping dies in the automotive industry. To obtain more comprehensive data sets, the client upgraded from photogrammetry to high-precision 3D laser scanning.
●Company: Tianjin RAINBOW HILLS (Toyota provider)
●Location: Tianjin, China
●Service: Production of cast iron components for automotive stamping dies
●Production capacity: 2200 tons/month
●Need: Obtain more comprehensive 3D data sets
●Solution: SHINING 3D FreeScan metrology solutions
●Results:
○Information-rich 3D inspection reports, facilitating communication with partner providers and clients
○Streamlined (and more portable) 3D inspection workflow
This case study about 3D scanning stamping dies is also available on YouTube:
Introduction
Stamping dies play a critical role in the automotive production process. They’re used for doors, side panels, fenders, and many of the numerous other parts that make up a car. These dies must respect numerous quality standards to produce high-quality parts.
Companies must inspect the dies to ensure they meet dimension and quality requirements.
Tianjin RAINBOW HILLS (est. 2004) is one such company, specializing in the production of cast iron components for automotive stamping dies. It’s the sole designated casting manufacturer for Toyota in China and offers a monthly production capacity of 2200 tons.
This article explores why Tianjin RAINBOW HILLS decided to upgrade its inspection workflow, by 3D scanning stamping dies with laser-based solutions instead of photogrammetry.
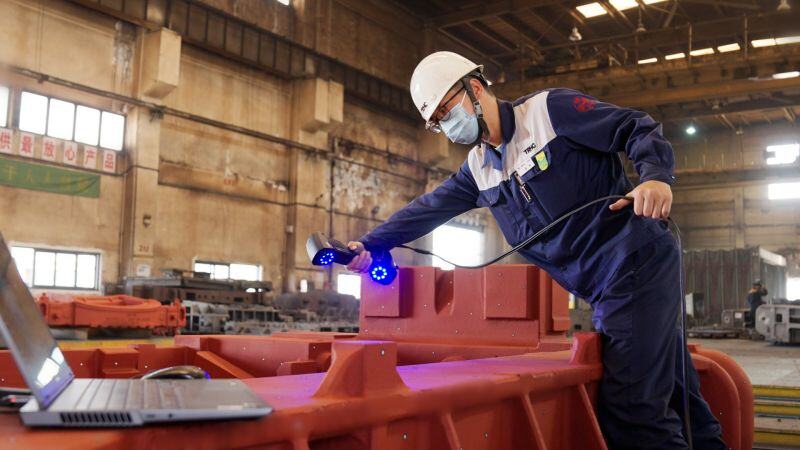
An engineer at Tianjin RAINBOW HILS using a FreeScan UE Pro to analyze a surface.
Discover the product you're looking for
- Full specifications
- Using scenarios
- Key features
- Even comes with a bundle!
Inspecting Stamping Dies With Photogrammetry
Stamping die production is divided into two main processes: manufacturing and machining. Typically, upstream (for manufacturing) and downstream (for machining) enterprises carry out these processes separately. They must however work collaboratively to complete the overall production.
In this case, Tianjin RAINBOW HILLS is the upstream casting enterprise. Its downstream mold machining partner, which utilizes high-precision 3D scanning for dimensional inspection, inspired Tianjin RAINBOW HILLS to adopt the technology as well.
Before upgrading to high-precision laser 3D scanning, Tianjin RAINBOW HILLS was using photogrammetry with single-lens reflex cameras.
Note: “Photogrammetry” here refers to the reconstruction of an object’s spatial position and shape using photographs of the object to calculate 3D point coordinates. This differs from the FreeScan Series’ built-in photogrammetry, which serves to capture accurate global markers to later ensure high precision in data stitching and overall 3D scanning accuracy.
While this method can capture accurate 3D measurements, it can only do so for specific point coordinates. This provides a limited set of references during the machining of the stamping dies. In the production of automotive body parts, there are stringent requirements for the entire surface profile. Thus, it makes more sense to capture the surface as a whole rather than just some of its points.
3D Scanning Stamping Dies for Better Data and Communication
Drawing on the experience and recommendations from their downstream partner, Tianjin RAINBOW Hills opted for SHINING 3D’s FreeScan Series of high-precision metrology solutions.
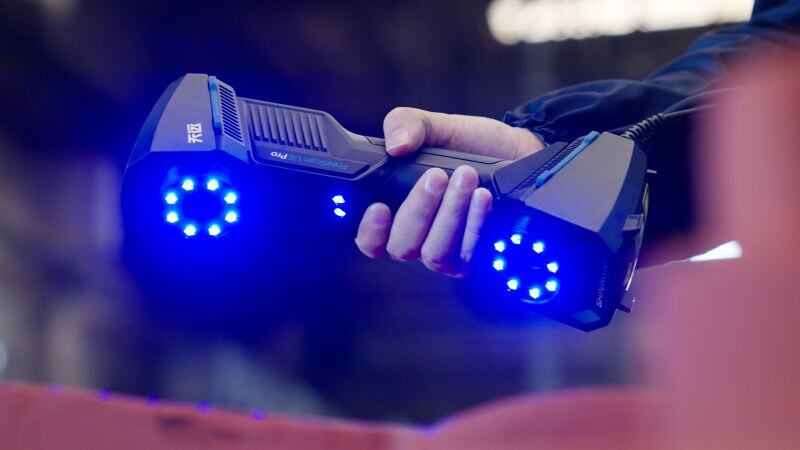
The FreeScan UE Pro laser 3D scanner for industry and inspection.
The team is now able to capture more detailed 3D data sets of their castings. They can measure and analyze entire surface profiles, providing partners with comprehensive 3D inspection reports. These reports, featuring visual representations like chromatograms for machining allowances, enhance the overall understanding of the product.
This improved information flow contributes to smoother product delivery and streamlines production for the downstream machining company. Additionally, it helps in clarifying responsibilities between companies, particularly in resolving cutting issues during the machining process. The availability of complete dimensional information has effectively eliminated such challenges from the production scenario.
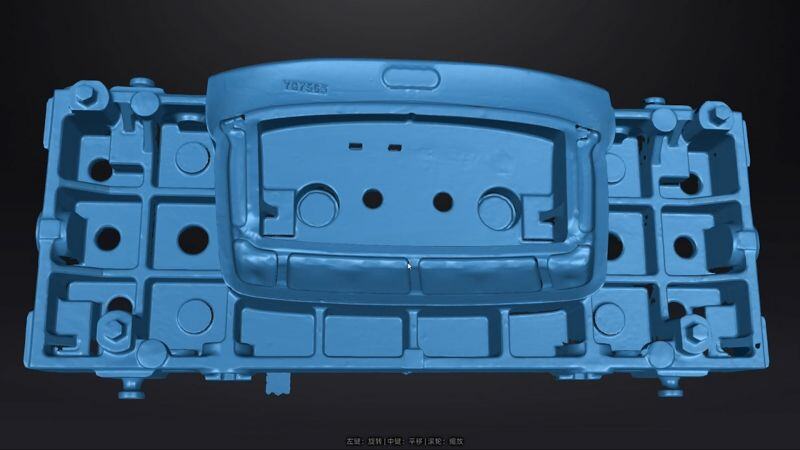
The resulting data set after 3D scanning stamping dies with the SHINING 3D FreeScan series.
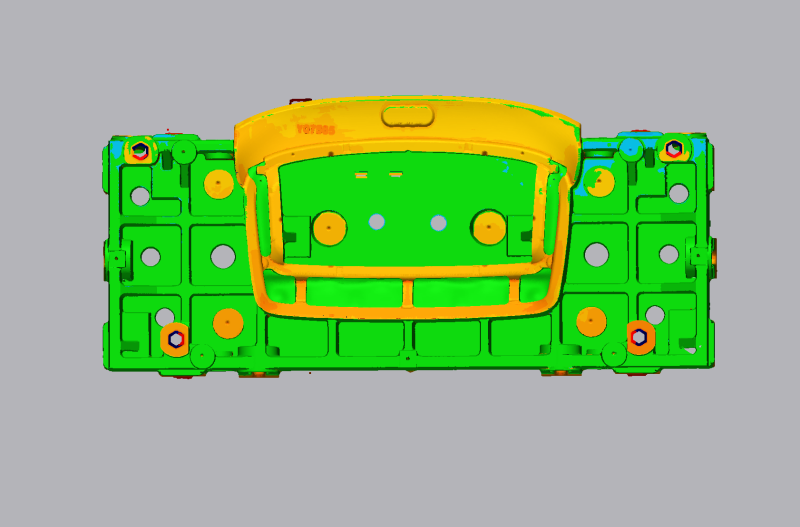
An example of a chromatogram schematic included in inspection reports.
Handheld 3D scanners from the SHINING 3D FreeScan series, like the FreeScan UE Pro or FreeScan Combo, are ideal candidates for 3D inspection for several reasons.
The first is of course their high precision. They can reach an accuracy of up to 0.02mm, ideal for demanding metrology projects.
Note: The FreeScan Series is ISO 17025 certified, following VDI/VDE 2634 Part 3 standards. This involves evaluating detection error performance based on traceable sphere diameter measurement data. Measurements are conducted from multiple perspectives within the working range using traceable length standards to assess sphere-to-sphere spacing errors. Volumetric accuracy can also be further optimized through build-in photogrammetry.
As handheld 3D scanner, FreeScan series are also easy and feasible to use directly in the production workshop. In a nutshell, the technician or engineer only needs to plug the 3D scanner into a power outlet and to a computer, and then point and shoot at the surface.
These 3D scanners are fast and efficient compared to photogrammetry processes which involve tripod setups, camera setting adjustments, and lengthy data processing.
They’re also much more versatile, capable of 3D scanning stamping dies of different shapes, sizes, and materials. The FreeScan UE Pro and FreeScan Combo can even capture highly reflective materials (e.g., shiny machining metal) without powder spraying.
Visit our 3D Metrology Solutions page to learn more about these 3D scanners’ key features and specifications.
Conclusion
By upgrading from point detection to surface detection, Tianjin RAINBOW HILLS has gained in inspection efficiency. They obtain more comprehensive data sets, generate detailed inspection reports, and communicate more smoothly with their partners.
In addition to these benefits in quantity and quality, high-precision 3D scanning has gradually become a standard 3D measurement tool in the automotive industry, widely applicable in car design, component dimension inspection, and other areas, contributing to the rapid development of the automotive industry.
Are you ready to upgrade your 3D inspection workflow? Contact our team today to see how the FreeScan Series can meet your requirements.
.png?width=174&height=350&name=T%20(12).png)
FreeScan UE Pro
FreeScan UE Pro inherits the high-precision, metrology-grade accuracy, and lightweight design of FreeScan UE, while enhancing the ability for fine scanning and global precision control of large-scale workpiece scanning.
- Metrology-Grade High Accuracy
- Global Precision Control
- Multiple Scanning Modes
- Easy Operation
